blog header

blog header

Tuesday 28 February 2017

Gobblinoiding at last!

Long-term followers of Fimm McCool's may remember this post from waaaaaaay back:

Citadel Combat Cards

When I was a kid Citadel Combat Cards were one of my favourite activities, especially on long car journeys. The first pack I got was a present from my great aunt, now sadly deceased. About 7 years ago I decided I wanted to collect every miniature portrayed on the cards and paint them to match. It took me 3 years, during which I learnt a lot about variant greenskins, the conversions of Kev Adams and Fraser Gray's painting style (I would not be using enamels to try and reproduce the work of the master!). Long story short, the collection then sat in a box, another box, a drawer and eventually made it onto a shelf while it waited for a slot in the painting queue. Almost 4 years later that slot has arrived! Now, not all that space is lack of time, I wanted to wait until my painting (and sculpting- there's quite a lot of 'conversion' work to do) skills were good enough for me to feel like I could do justice to the project. Last year was pretty manic with Oakbound stuff and there are still plenty of projects on the go, but I'm going to go a bit easier at it this year and enjoy hobby time. It'll probably take well over a year to finish them, but at least I'm making a start. So, without further waffle, let's see some pics:


Nobrun Darkfist is the model I decided to start with, largely because he was already primed and didn't need any sculpting on... so I thought! I only realised when I started painting there were some oddities about this model. Firstly the miniature I had only had a single arm band- the one with the horn. The model on the card, however, has two. I have since discovered that there are one and two-banded variants of this model, still no idea why. I green stuffed a new band on. However there was a second weirdness because my model has nicely detailed ends to the leather straps hanging from his belt and a defined ridge around the arm band. The CC model is much rougher, with less detail on the earring tassel as well as the aforementioned details missing. Why does it seem like a much cruder casting? Maybe a thick undercoat obscured the details? Maybe photography washed them out? Who knows. If the model is still in existence it may be possible to verify, but otherwise we can only guess.


I used Foundry and Vallejo paints (with some 80s Citadel inks) to paint Nobrun. I've been getting into the Foundry system recently, not the process but the paints, and find them excellent. Some are a bit too watery for my tastes, but the triad colour range makes highlighting, shading and picking spot colours such a breeze. I hummed and hahed about his shield. The one he currently has is a 14mm 'orc' shield and looked right when I was picking shields for them. I now suspect the CC model has a 16mm 'fighter' shield. A friendly Oldhammerer is sending me some so I can fix that. In the meantime I have painted his shield to match the next CC model I am going to work on. Basing has also been a fun issue. The photography will have changed the colours, but I wanted to go as close as possible to the colours of the card. That meant finding a green/yellow flock, which proved very hard. All the railway and wargames suppliers I tried had flocks that were too green or too yellow, nothing just right. Eventually, having ordered a couple to test, I mixed my own from Javis 30 'sand' and Model Tree Shop 'Light Green' and got something that looks about right under daylight conditions (note, the picture above is not the final flock, just sprinkled on for the photo).


Calling Nobrun finished for now I moved on to Ylag Blackskull (the guy whose shield Nobrun is currently looking after). This guy needed some serious green stuff work to approximate the orc on the card. As Lee Morley pointed out on the Oldhammer Facebook page, the body is most likely the one on the right here:


rather than the one I picked. If I'd spotted that beforehand it would have saved a bit of green-stuff work, I was going by the head and legs on the miniature I chose. But it's all good practice. I reckon, going by the similarity of the legs on all these orcs, there was probably a blank orc body which got dressed in various ways to give these different results. Anyway, apart from a bit more modification
to the sword and torso I'm happy with my recreation. Now to get painting!

Share/Bookmark

Thursday 16 February 2017

Collected Warhammer Volumes part 9: Al ook through volumes 1 and 2.


Having discussed the binding of these books let's turn our attention to their contents. After all, that's what this is all about, chronicling the journey of Warhammer Fantasy Battles from its inception to its discontinuance. As they're both relatively slim and self-contained we'll start rooting through volumes one and two, the first two editions and supporting material.


Volume 1- Forehammer begins with endpages by Josh Kirby from Terry Pratchett's Bromeliad trilogy. For no other reason than I had these posters, love them and associate them with my experience of fantasy from the 80s and 90s.


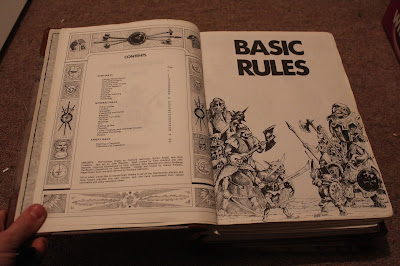
Volume 1 contains the three books from the Warhammer box, with glorious black and white art by Tony Ackland. At this stage 'Fantasy Battles' isn't quite right because what you've got is rules for fighting combat on the tabletop with miniatures but we're talking very small and character-driven skirmishes. This is essentially a tabletop RPG, which absolutely floats my boat having just written The Woods for exactly that kind of gaming. Interestingly that's now going in a mass-battle direction, perhaps echoing the rise of Warhammer...


Next up we've got the three books from Forces of Fantasy, plus the book of Battalions which pops up later. This supplement expands the magic, bestiary, items and scope of the original rules.


Whilst there are plenty of creatures there's really no definite setting provided anywhere here. The Redwake River Valley scenario in the rulebooks is as close as we get to a world for the game (and features as the cover of this volume).


More lush black and white art from Tony Ackland.


Then we come to the Citadel Compendiums. These are included here as their size makes them compatible with the first edition books whilst they are shorter than the second edition books. There's not too much difference between the two and the content of the Compendiums is suitable for both editions.


A bit more of a glimpse of the developing Warhammer world is given to us in the form of Kremlo the Slann and the Shrine of Rigg scenarios. Vikings in the lush jungles was very much in vogue!


To accompany the Shrine of Rigg we have a look at mixing science fiction into the fantasy world, a precursor to Rogue Trader where ancient cultures rub up against strange technologies.


Everyone's favourite fantasy setting (maybe) gets some love with a Minas Tirith siege which must have been enormous by the standards of the era.


The Book of Battalions contains the first Regiments of Renown to be seen in Warhammer, some of them continuing long into the game's future.


And another Paul Kirby image (Strata) to round off.


Each core volume has a synopsis of the To Hit and To Wound charts, shooting modifiers, combat resolution (when it came in) and saving throws. Because there are subtle changes, and not so subtle changes in the first few volumes!


Volume 2- Plothammer uses the endpages I salvaged from my 3rd Ed hardback (signed by Bryan Ansell and Kev Adams) and amalgamated with bits of the Armies endpages.


The second edition rules were also in a 3-book format.


And Norse and Slann returned once more in the Magnificent Sven scenario.


The reason for calling this edition 'Plothammer' was twofold. Firstly it follows the example of first edition in its focus on roleplay rather than pitched battles. Secondly there was a wealth of narrative scenarios produced for it. At a time when the Warhammer world was beginning to mesh together in coherency it was shaped by the publication of some important pieces of Oldhammer history.

 
The Riding was published to accompany the famous Townscapes card buildings. It seems incredibly hard to track down and in the end I settled on a print-out PDF which I was lucky enough to source online. It's entirely setting, detailing a region of what we'd now call the Empire along with the inhabitants of the small villages and their customs and traditions.


Orc's Drift has a character you might expect going by the names of its authors.


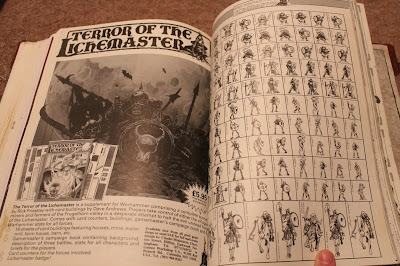
Terror of the Lichemaster introduced the infamous Heinrich Kemler (one M) who became a key character in the events of the Warhammer world right up until its end.


And, of course, McDeath with its literary references and terrible puns.


Next we have the Citadel Journals, included in this volume because it most closely matches their size, although the Journals required trimming to adequately match the rest of the text block. Fortunately they have wide margins.


The second Journal was a gift from the most-excellent Zhu and it only seemed right to keep his epistle in the canon. Especially as it is scribed on the reverse of a print of Tony Yates' artwork!


These shall not be cut out!


The wonderful and sadly unfinished saga of Kaleb Daark.


Thanks to BOYL the Arcane Armorials competitions sport entries by Tony Ackland...


...and Tony Yates. Sadly I was unable to get Wayne England's entry for the T-Shirt competition.


Excellent dioramas in true 80s style. Bet these aren't at Warhammer World.


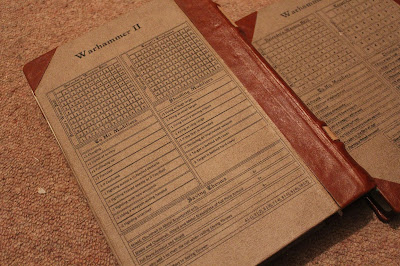
And rounded off with another reference sheet. In these two editions there's no combat resolution modifiers, all the bonuses are applied in To Hit modifiers. Many of the Shooting Modifiers and Saving Throws, however, are largely unchanged all the way through the editions.

Next up, Volume 3- Oldhammer. Where it really begins.... ;)
Share/Bookmark

Wednesday 15 February 2017

Collected Warhammer Volumes part 8: Step through binding part 4- Fully ReCovered

 
Well it's been a few years in the pipeline and a good while since the last instalment of this series, but the Encyclopaedia Warhammica is finally all bound up! As you can see (squeezed in between my undead army and glacial lake- projects which I started in November and almost beat the Encyclopaedia to completion!) the 15 volumes look rather splendid in their various shades of leather. In the weeks to come I'll be taking a good look through the pages and charting the progress of Warhammer from 1st through to 8th edition, but first let's finish what we started and complete the rough guide to binding these mighty tomes.
 
When we left off last time the book was in the 'press' after having its boards glued on. Now, the last stage requires quite a lot of hands-on action, so not a lot of time to pause for photography and I'm afraid I will just have to try to explain the processes as best I can. 
 

Fixing the leather spine in place is the next point, and the place where it really begins looking like a book. Measure the height and width of your card spine and add about two inches to the width and 20-30cms to the height. This is to give you a good wide surface to stick to the boards. The leather you choose is quite important, it's going to form the hinge of the book so the thicker the book the thicker (stronger) the leather will need to be. Too stiff though and it will be hard to get it into shape. I got my leather from a local scrap store so couldn't be too choosy. Some of it was pretty hard to work with and I had to use bulldog clips to hold it while the glued dried. I don't recommend doing this as it marks the surface. The tan leather in the picture was a bit too soft on the other hand and loses its shape a little because of it.

The technique is to glue one edge of the leather onto a board. I choose the front one because this line you'll know will be even and it's more important for the front to look good. I think anyway. Once this is relatively set glue the spine of the book and the underside of the leather strip and start working the leather onto the spine. IMPORTANT BIT!: Make sure you pull the board away from the spine a bit and get the leather to stick to the edge of it and across a few millimetres of the fabric before it reaches the spine. Otherwise you'll find the board has to crease to open and it will wreck the cover and make using the book pretty hard. Working the leather over the spine pull fairly tight and keep rubbing down as you go. Once you've reached the other board repeat the process as with the front cover. Then use a curved clay shaper or rounded dowel to work the leather down into the corners and ridges, you don't want any voids underneath and the thick strips of leather underneath should be clearly defined. At this point I usually put the book back into a stack to keep it pressed down and wait a few hours for the glue to start going off. If you're feeling brave you can go straight onto the next step...


You should have a few centimetres of leather extending from the top and bottom of the book. This bit is a little fiddly, but persevere with it and don't be afraid to be a bit rough with the leather, it can take it! What you're looking to do is fold over the excess leather so that it lies over the underside of the boards but tucks inside itself on the outside of the spine. This is why it's best not to have the fabric hinge extend right to the edge of the spine, the leather needs some space to tuck through. You might have to prise back the leather from the top of the spine, that's ok, make sure you put a lot of glue down into the gap before tucking the excess in to it.

Return the book to the stack/press and wait for the glue to cure. Now your book is finished. But of course you'll want to make it prettier so we need to add covers, corners and endpages. I used wallpaper with images printed on and a glaze applied to seal as my covers, but you can use fabric, more leather, a poster, whatever you like really. It's just a case of gluing it in place and wrapping the edges around the boards onto the underside. You can use strips of card with a torn edge to blend your cover up to the thickness of the leather for a nice, flush look. I didn't in most cases because the leather I was using was so thick it would have looked sillier having the cover slope up to it than it did having the edge of the leather exposed.


To make the corners slice across the cover at the angle you want the corner to sit on. Don't cut the whole corner away, just remove whatever you covered it with and the top layer or two of the board to help the leather sit flush. Then cut four squares of leather with each side about 2cm wider than the hypotenuse of the corner. Glue these in place and allow the glue to set.


This bit is tricky to get neat. Make two cuts in the leather square so you have a strip which begins about 6-8mm wide at the corner of the board and ends about 20mm at the edge parallel to the hypotenuse. Fold this strip over and glue it to the board, pulling it pretty tight. Then fold each of the side flaps around the board and trim off the excess where they meet the strip you just glued down. Pull these in tight and glue them down, you should have something like this:


With a bit of glue and manipulation you can make the corner less square, it works best with soft, stretchy leather. Allow it to dry fully and trim the inside of the corner to a nice straight line, but allow at least a cm border from the edge of the board before you trim.
 
 
Now, endpages. The end of the process. I'm using posters but you can use marbled paper, plain coloured paper or anything else you like. First step is to cut the paper to a size a few centimetres larger than the width and height of your open book. Decide which half of the piece is going to glue to your board and cut this half to the size of the board minus about a cm border all the way around. Make sure you don't trim down the part of the endpages which will sit against the text block. Glue the endpages to the board, working it down into the crease between the board and the text block. Apply a thin strip of glue to the spine edge of the first page and rub the endpages down onto it. Press some waxed paper (or something else that is flat and won't stick to the endpages) into the crease between the board and text block and close the book. Now open it again and check there aren't any creases you need to press out. If everything's ok then close the book, press it and wait for the glue to set.
 
Once the glue is dry you will have a finished book with the edges of the endpages protruding from the sides of it. The last step is to turn the book so the text block is sitting on top of the endpages you need to trim and CAREFULLY run a scalpel around the edge of the text block to trim the endpages neatly to size. Use a sharp scalpel and place a cutting mat between the text block and the board to avoid cutting into your cover. Then, YOU'RE DONE.:)
 
Sorry it took a few years. Any questions (I may need to clarify a bit, it's hard without pictures) just comment and I'll do my best to explain. Rundown of each volume coming soon.


Share/Bookmark

Friday 3 February 2017

The Frugelhorn takes shape...


About 6 weeks after I started on the big board there's just one module left to go, the glacial lake. Of course, these modules aren't fully finished, still some way to go before I'll be happy with them.


After spending an hour cutting up acrylic sheet to make snow the way I usually do for bases I came to the conclusion that it would take far too long to do enough for powder effects on all these boards. I gave in and bought some Woodland Scenics fine flake snow powder. Haven't tried it yet, but my plan is to use it to blend the bare areas with the body of the snow and to decorate the more 'trodden' areas, where the passing traffic disturbs the surface of the fallen snow. The board is set on the brink of the spring thaw, with the rivers just beginning to pick up momentum as the meltwater runs down into them, so I don't want any of the snow to look freshly fallen. It has all sat there for several months, hence the relative lack of it on the trees (although I will whiten up a few of the bare ones so there isn't quite so much contrast). I also need to do a bit more dressing on the trees as they are crappy Chinese imports (cheap) and shed a lot of their foliage in transit. Most of the work left to do, however, is detail on the mine board.


The sleepers are laid, but I need to lay the cart tracks (fine piano wire pinned in place) and finish off the cart. The black 'gulley' will be where the dwarves are storing their casks of Bugman's ale to keep cool, lots of barrels to paint for there.
 

The water chute running out of the mountain (diverted undergroundstream I guess, it appears on the Lichemaster maps. Probably serves to drain the mine workings and to provide a water source outside) is mostly done. The pouring water is a fibre optic taken from one of the small Christmas trees I added to the foresty bits. By running some of the pigmented Glasscast epoxy down it I was able to get a more uneven, 'flowing' effect. It cascades into a silicone splash. The chute needs some more packed snow around it and a bit more work on the wood itself.


Because I wanted the pool to tie in with the other rivers on the board I decided to give it lock gates allowing the miners to control how full it gets. With the current level of meltwater flowing off the mountain the pool is quite full and they have opened the gates to prevent flooding. The gates are more Christmas tree... our real one this time! Cut off and dried out in the oven, it also provides the material for the dam walls and the bridge. I grant you these aren't the most watertight gates ever, but having cruised the Kennet and Avon canal I've seen leakier! The screws for raising the paddles need some proper handles putting on the top to disguise the heads.


And here's a second 4x4 configuration which we used for a game of The Woods last night. The mine is home to a band of Spriggans who are trying to get back to it with their stolen sheep before daybreak. In their absence a band of opportunists are trying to make it away with as much of the Spriggans' loot as possible. The villagers who had their sheep stolen are in hot pursuit, but their way runs through a pass controlled by a gang of bandits who are planning on extracting as much tax as possible from anyone passing by. Dawn is not far away...
Share/Bookmark

Fimm McCool's

Fimm McCool's